# Configure and access shared folders on Linux

In this article, you will learn how to configure a new network share and access a folder shared from another device using Debian-based Linux distributions.

{% hint style="info" %}
**Note**

For this procedure, Ubuntu 22.04.1 LTS is used as an example.
{% endhint %}

## Configure a network share

For the purpose of this guide, we will be using the [Samba](https://wiki.samba.org/index.php/Main_Page) suite of applications, which provides access to SMB/CIF protocols.

### Prerequisites

Before you start the sharing process, be sure to complete the following steps to prepare your system:

1. Update all of your repositories and install Samba by running the following command in the terminal:<br>

   ```bash
   sudo apt update && sudo apt install samba -y
   ```

2. Change permissions for the `/home/$USER` directory to allow access by running this command:<br>

   ```bash
   sudo chmod 755 /home/$USER
   ```

### Method 1: GUI

For a quick and easy configuration, you can set the network-sharing options using the system’s file manager.

1. Open **Files** and navigate to the folder you wish to share.
2. Right-click the folder, select **Properties,** and click **Local network share**.
3. Select **Share this folder**, and enter the name for your network share.
4. Select **Guest access** to allow passwordless access to the shared folder.
5. Click **Create share**.\
   \
   ![Local network share settings of a folder](https://3559400189-files.gitbook.io/~/files/v0/b/gitbook-x-prod.appspot.com/o/spaces%2F0cTezbT2vN0lurEio8Z5%2Fuploads%2FLFhTzOwyHonYcFCnLG8n%2Flinux_sharing_window.png?alt=media\&token=fb4cb88c-b57f-4b21-b678-de9ba0029050)

### Method 2: CLI

In case the file manager you are using does not provide the required settings or you are using a headless setup, the network share configuration can be completed using the command line.

1. Open the terminal.

2. Navigate to the folder that you want to share and print out its full path by using the `pwd` command.<br>

   **Example**

   ```bash
   /home/ubuntu/Desktop/MeshnetFolder
   ```

   <div align="left"><figure><img src="https://3559400189-files.gitbook.io/~/files/v0/b/gitbook-x-prod.appspot.com/o/spaces%2F0cTezbT2vN0lurEio8Z5%2Fuploads%2FS9MeYLAGzDVdus6TDiVw%2Fpwd.png?alt=media&#x26;token=a3d1e011-77c3-48b9-b2fc-c186b70bfe50" alt="Output of &#x27;pwd&#x27; command"><figcaption></figcaption></figure></div>

3. Run the following command to open the Samba configuration file using the Nano text editor:<br>

   ```bash
   sudo nano /etc/samba/smb.conf
   ```

4. At the end of the file, add the following information where `<name>` is a specific name for your network share and `</path/to/folder>` is the full path from Step 2:<br>

   <pre class="language-bash" data-overflow="wrap"><code class="lang-bash">[&#x3C;name>]
   path = &#x3C;/path/to/folder> 
   browsable = yes 
   writable = yes 
   guest ok = yes 
   guest only = yes
   </code></pre>

   &#x20;

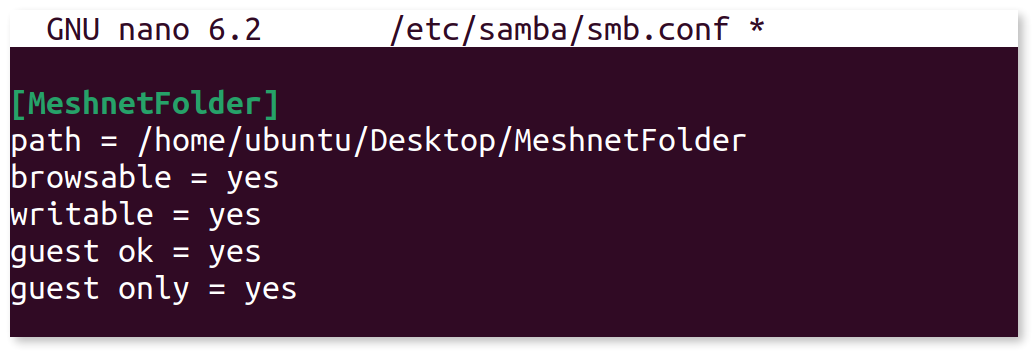
   The complete configuration in the `smb.conf` file for `MeshnetFolder` would be:

   &#x20;

   <div align="left"><figure><img src="https://3559400189-files.gitbook.io/~/files/v0/b/gitbook-x-prod.appspot.com/o/spaces%2F0cTezbT2vN0lurEio8Z5%2Fuploads%2FrhhMpGaxXoCSWql1sZSU%2Flinux_smb-conf.png?alt=media&#x26;token=583e041b-3bc2-4e47-a8a1-dc832fb6507f" alt="Edited &#x27;smb.conf&#x27; file"><figcaption></figcaption></figure></div>

5. Press **Ctrl** + **X**, **Y**, and **Enter** to save changes and exit.

6. Run the following command to restart the Samba daemon process:<br>

   ```bash
   sudo systemctl restart smbd
   ```

## Access shared folders

Most Linux file managers let you directly access files shared on other devices. In this example, you will learn how to access a network share using GNOME Files.

1. Run the `nordvpn meshnet peer list` command, and copy the Nord name of the peer you wish to reach.

2. Open GNOME **Files** and select **Other locations** in the sidebar.

3. In the **Connect to server** field, enter `smb://`, paste the Nord name followed by a slash (/) and the name of the network share, and click **Connect**. \
   \
   **Example**

   `smb://secret.meerkat-everest.nord/MeshnetFolder`<br>

   <div align="left"><figure><img src="https://3559400189-files.gitbook.io/~/files/v0/b/gitbook-x-prod.appspot.com/o/spaces%2F0cTezbT2vN0lurEio8Z5%2Fuploads%2FiRJBa1KzxOuELvEhH6Fx%2Fconnect_1.png?alt=media&#x26;token=b29d8560-1f2d-4d07-af1e-a70c676e6afc" alt="Connecting to a shared folder"><figcaption></figcaption></figure></div>

4. Select **Anonymous** or **Registered user**, depending on the folder’s configuration. Click **Connect**.\
   \
   ![Authentication screen](https://3559400189-files.gitbook.io/~/files/v0/b/gitbook-x-prod.appspot.com/o/spaces%2F0cTezbT2vN0lurEio8Z5%2Fuploads%2FdsKgKOh0xmXcFhFv9LRH%2Fconnect_2.png?alt=media\&token=0d98e380-ec32-4e40-bcfd-f93fa42e6ab7)

## Mount a network share

Once you restart your machine, the network share that you connected to will become unavailable. To access it again, follow the steps outlined in the [Access shared folders](#access-shared-folders) section. However, you can mount the shared folder directly onto your operating system for convenient access whenever you need it. On Linux, you can achieve this by using [CIFS](https://wiki.samba.org/index.php/LinuxCIFS_utils).

### Prepare a mounting point

1. Open the terminal.

2. Update all of your repositories and install the CIFS tool by entering the following:<br>

   ```bash
   sudo apt update && sudo apt install cifs-utils -y
   ```

3. Create a new directory using the `mkdir` command, where the network share will be mounted.\
   \
   **Example**

   ```bash
   mkdir MeshnetFolder
   ```

4. Navigate to the newly created folder using the `cd` command and print out its full path using the `pwd` command.

   <div align="left"><figure><img src="https://3559400189-files.gitbook.io/~/files/v0/b/gitbook-x-prod.appspot.com/o/spaces%2F0cTezbT2vN0lurEio8Z5%2Fuploads%2FyQeldE1I6mMxrx3NFxoc%2Fpwd2.png?alt=media&#x26;token=2ca4369c-65b9-405b-a4a5-77352b867822" alt="Ouput of &#x27;pwd&#x27; command"><figcaption></figcaption></figure></div>

5. Check your user ID by executing this command:<br>

   ```bash
   echo $UID
   ```

### Edit the file system table

1. Open the `fstab` file with root privileges using the Nano text editor by running this command:<br>

   ```bash
   sudo nano /etc/fstab
   ```

2. At the end of the file, add a line for the network share.<br>

   For guest access:

   <pre class="language-bash" data-overflow="wrap"><code class="lang-bash">//&#x3C;NordName>/&#x3C;ShareName> &#x3C;/path/to/folder> cifs guest,uid=&#x3C;UID>,iocharset=utf8 0 0
   </code></pre>

   For access with username and password authentication:

   <pre class="language-bash" data-overflow="wrap"><code class="lang-bash">//&#x3C;NordName>/&#x3C;ShareName> &#x3C;/path/to/folder> cifs username=&#x3C;USERNAME>,password=&#x3C;PASSWORD>,uid=&#x3C;UID>,iocharset=utf8 0 0
   </code></pre>

   Where:\
   • `<NordName>` is the Nord name or the Meshnet IP of the host device.\
   • `<ShareName>` is the name of the network share you are trying to access.\
   • `</path/to/folder>` is the path to the mounting point from Step 4 of the [Prepare a mounting point](#prepare-a-mounting-point) section.\
   • `<USERNAME>` and `<PASSWORD>` are the authentication details for accessing the network share.\
   • `<UID>` is the user ID from Step 5 of the [Prepare a mounting point](#prepare-a-mounting-point) section.

   \
   **Example**

   <pre class="language-bash" data-overflow="wrap"><code class="lang-bash">//secret.meerkat-everest.nord/MeshnetFolder /home/ubuntu/MeshnetFolder cifs guest,uid=1000,iocharset=utf8 0 0
   </code></pre>

3. Press **Ctrl** + **X**, **Y**, and **Enter** to save changes and exit.

4. Run the following command to mount the network share:<br>

   ```bash
   sudo mount -a
   ```

## See also

* [Configure and access shared folders on Windows](https://meshnet.nordvpn.com/~/changes/1En9yEoSh1cmyjIBsnEk/how-to/remote-files-media-access/set-up-folder-sharing/configure-and-access-shared-folders-on-windows)
* [Configure and access shared folders on macOS](https://meshnet.nordvpn.com/~/changes/1En9yEoSh1cmyjIBsnEk/how-to/remote-files-media-access/set-up-folder-sharing/configure-and-access-shared-folders-on-macos)
* [Access shared folders on Android](https://meshnet.nordvpn.com/~/changes/1En9yEoSh1cmyjIBsnEk/how-to/remote-files-media-access/set-up-folder-sharing/access-shared-folders-on-android)
* [Access shared folders on iOS](https://meshnet.nordvpn.com/~/changes/1En9yEoSh1cmyjIBsnEk/how-to/remote-files-media-access/set-up-folder-sharing/access-shared-folders-on-android)
