# Configure and access shared folders on macOS

In this article, you will learn how to configure a new network share and access a folder shared from another device using macOS.

## Configure a user for Windows and Linux

To provide access to your shared content for Windows and Linux, you need to create a new user account with a username and a password on macOS.&#x20;

{% tabs %}
{% tab title="macOS Ventura 13 or newer" %}

1. Select the Apple menu![](https://3559400189-files.gitbook.io/~/files/v0/b/gitbook-x-prod.appspot.com/o/spaces%2F0cTezbT2vN0lurEio8Z5%2Fuploads%2FWj71BFFMgsNmfe6ABDIW%2Fapple.svg?alt=media\&token=b9d31ae6-4141-4ca5-b9e7-99ac3cb0ef53) > **System settings**, and then click **Users & groups**.
2. Click the **Add account** button.&#x20;
3. In the new window, select **Sharing only**, fill in the required information, and click **Create user**.\
   \
   ![User account creation window](https://3559400189-files.gitbook.io/~/files/v0/b/gitbook-x-prod.appspot.com/o/spaces%2F0cTezbT2vN0lurEio8Z5%2Fuploads%2FmFwDBilVE3jd68Coe64R%2Fnew_user_config2.png?alt=media\&token=34713298-36f4-421e-b0a3-20c43ed74a53)
   {% endtab %}

{% tab title="macOS Monterey 12 or older" %}

1. Select the Apple menu![](https://3559400189-files.gitbook.io/~/files/v0/b/gitbook-x-prod.appspot.com/o/spaces%2F0cTezbT2vN0lurEio8Z5%2Fuploads%2FWj71BFFMgsNmfe6ABDIW%2Fapple.svg?alt=media\&token=b9d31ae6-4141-4ca5-b9e7-99ac3cb0ef53) > **System preferences**, and then click **Users & groups**.
2. Unlock the settings menu by clicking the lock in the lower-left corner of the window.\
   \
   ![Lock button](https://3559400189-files.gitbook.io/~/files/v0/b/gitbook-x-prod.appspot.com/o/spaces%2F0cTezbT2vN0lurEio8Z5%2Fuploads%2FaGygZBBlA7ZvXLApRfkJ%2Fmac_lock_button.png?alt=media\&token=94115080-f0cf-4278-a7b5-4e18a4e89bef)<br>
3. Enter your device’s password and select **Unlock**.
4. Click the plus (+) button on the sidebar menu.
5. In the new window, select **Sharing only**, fill in the required information, and click **Create user**.\
   \
   ![User account creation window](https://3559400189-files.gitbook.io/~/files/v0/b/gitbook-x-prod.appspot.com/o/spaces%2F0cTezbT2vN0lurEio8Z5%2Fuploads%2FQPl4TVk3NMTix1CI7lJm%2Fnew_user_config2.png?alt=media\&token=dd24afad-860c-4659-8701-a2b4c1da9ffa)
   {% endtab %}
   {% endtabs %}

## Configure the Guest user

To provide access to your shared content for other operating systems, you can use Guest user.

{% tabs %}
{% tab title="macOS Ventura 13 or newer" %}

1. Select the Apple menu![](https://3559400189-files.gitbook.io/~/files/v0/b/gitbook-x-prod.appspot.com/o/spaces%2F0cTezbT2vN0lurEio8Z5%2Fuploads%2FWj71BFFMgsNmfe6ABDIW%2Fapple.svg?alt=media\&token=b9d31ae6-4141-4ca5-b9e7-99ac3cb0ef53) > **System settings**, and then click **Users & groups**.
2. Find **Guest user** and click the Info![](https://3559400189-files.gitbook.io/~/files/v0/b/gitbook-x-prod.appspot.com/o/spaces%2F0cTezbT2vN0lurEio8Z5%2Fuploads%2FwzE1Q17LTv7SC9DLtPaZ%2Finfo.svg?alt=media\&token=3906cd76-81b4-4a74-bf22-1d7de4b5c8c5) button.
3. In the new window, enable **Allow guest users to connect to shared folders** and click **Done**.\
   \
   ![Guest user window](https://3559400189-files.gitbook.io/~/files/v0/b/gitbook-x-prod.appspot.com/o/spaces%2F0cTezbT2vN0lurEio8Z5%2Fuploads%2FX52FgzitgVCICGKD3ZeQ%2Fmac_user_guest.png?alt=media\&token=3218281f-9a47-4725-980d-c5a35a103bfc)
   {% endtab %}

{% tab title="macOS Monterey 12 or older" %}

1. Select the Apple menu![](https://3559400189-files.gitbook.io/~/files/v0/b/gitbook-x-prod.appspot.com/o/spaces%2F0cTezbT2vN0lurEio8Z5%2Fuploads%2FWj71BFFMgsNmfe6ABDIW%2Fapple.svg?alt=media\&token=b9d31ae6-4141-4ca5-b9e7-99ac3cb0ef53) > **System preferences**, and click **Users & groups**.
2. Unlock the settings menu by clicking the lock in the lower-left corner of the window.
3. Enter your device’s password and select **Unlock**.
4. Click **Guest user** and select **Allow guest users to connect to shared folders**.\
   \
   ![Guest user window](https://3559400189-files.gitbook.io/~/files/v0/b/gitbook-x-prod.appspot.com/o/spaces%2F0cTezbT2vN0lurEio8Z5%2Fuploads%2FxRNIYIZtFMHOVxyENYRx%2Fmac_guest_user.png?alt=media\&token=32eb5f0e-5f48-48e8-8494-e48b8660bf7f)
   {% endtab %}
   {% endtabs %}

## Configure a network share

Once all of the user changes have been completed, you can proceed to share a folder.

{% tabs %}
{% tab title="macOS Ventura 13 or newer" %}

1. Select the Apple menu![](https://3559400189-files.gitbook.io/~/files/v0/b/gitbook-x-prod.appspot.com/o/spaces%2F0cTezbT2vN0lurEio8Z5%2Fuploads%2FWj71BFFMgsNmfe6ABDIW%2Fapple.svg?alt=media\&token=b9d31ae6-4141-4ca5-b9e7-99ac3cb0ef53) > **System settings**.
2. Head to **General** and choose **Sharing**.
3. Enable the **File sharing** option and click the Info button.\
   \
   ![File sharing turned on](https://3559400189-files.gitbook.io/~/files/v0/b/gitbook-x-prod.appspot.com/o/spaces%2F0cTezbT2vN0lurEio8Z5%2Fuploads%2FtpBwIzkpE0adIC24pFMv%2Fmac_system_sharing.png?alt=media\&token=1054a7e5-3395-4335-a562-945b352dbd8b)<br>
4. Add the folders you want to share by clicking the plus (+) button in the **Shared folders** section.
5. Click the **Options** button.
6. Select **Share files and folders using SMB**, choose the user created for Windows and Linux earlier, and click **Done**. You may be asked to enter the password of the added user.\
   \
   ![SMB sharing enabled](https://3559400189-files.gitbook.io/~/files/v0/b/gitbook-x-prod.appspot.com/o/spaces%2F0cTezbT2vN0lurEio8Z5%2Fuploads%2F3WbTZXLBCxvuXOzFhWg0%2Fmac_sharing_windows.png?alt=media\&token=ee267178-4587-44ec-a52a-42f1415f42d5)<br>
7. Click **Done** to exit.\
   \
   ![Configured file sharing window](https://3559400189-files.gitbook.io/~/files/v0/b/gitbook-x-prod.appspot.com/o/spaces%2F0cTezbT2vN0lurEio8Z5%2Fuploads%2FohSowCP7gyVveRd8Qws6%2Fmac_sharing_settings.png?alt=media\&token=2bda648c-4286-42ad-a7d5-3e6464a063c2)
   {% endtab %}

{% tab title="macOS Monterey 12 or older" %}

1. Select the Apple menu![](https://3559400189-files.gitbook.io/~/files/v0/b/gitbook-x-prod.appspot.com/o/spaces%2F0cTezbT2vN0lurEio8Z5%2Fuploads%2FWj71BFFMgsNmfe6ABDIW%2Fapple.svg?alt=media\&token=b9d31ae6-4141-4ca5-b9e7-99ac3cb0ef53) > **System preferences**, and then click **Sharing**.
2. Select **File sharing** and add the folders you want to share by clicking the plus (+) button.
3. To allow devices with other operating systems to access the shared folders, click the **Options** button in the **File sharing** section.
4. In the new window, select **Share files and folders using SMB**, select the user created for Windows and Linux earlier, and click **Done**. You may be asked to enter the password of the added user.

   \
   ![SMB sharing enabled](https://3559400189-files.gitbook.io/~/files/v0/b/gitbook-x-prod.appspot.com/o/spaces%2F0cTezbT2vN0lurEio8Z5%2Fuploads%2F3WbTZXLBCxvuXOzFhWg0%2Fmac_sharing_windows.png?alt=media\&token=ee267178-4587-44ec-a52a-42f1415f42d5)

   &#x20;
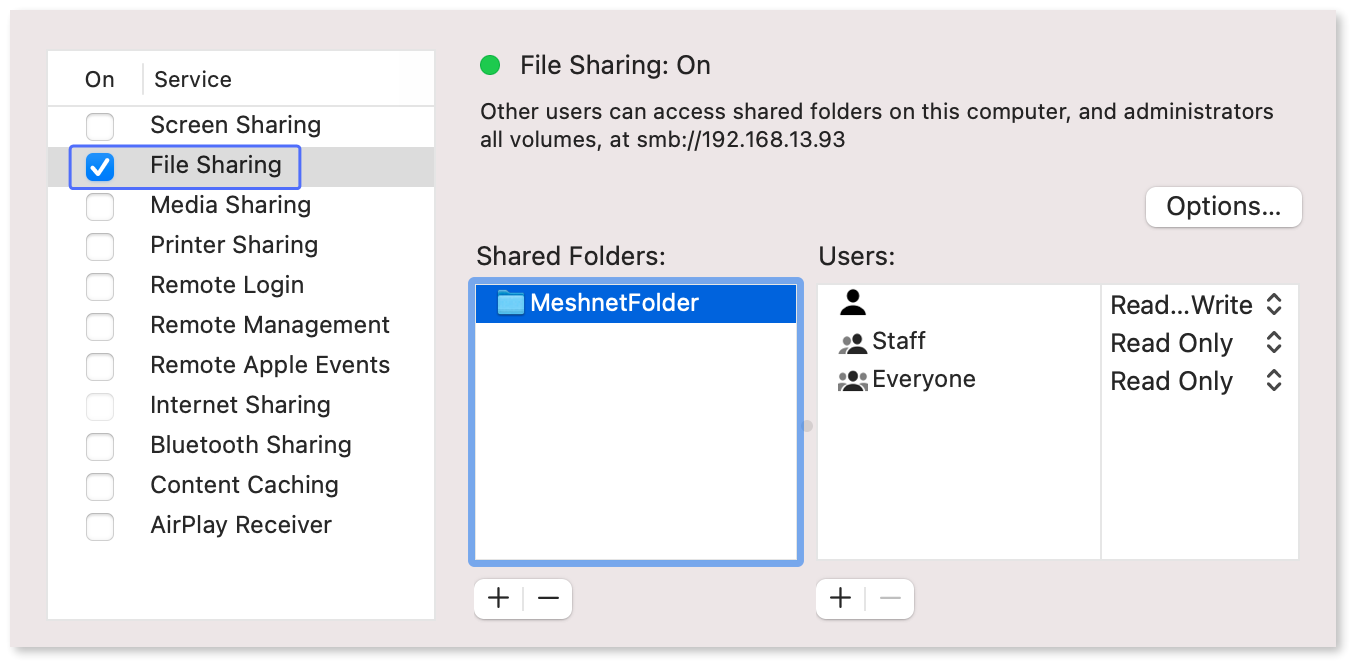
5. The finished configuration should look as shown:<br>

   <div align="left"><figure><img src="https://3559400189-files.gitbook.io/~/files/v0/b/gitbook-x-prod.appspot.com/o/spaces%2F0cTezbT2vN0lurEio8Z5%2Fuploads%2FrZArovFGv7q7vYXd6lML%2Fmac_file_sharing.png?alt=media&#x26;token=8e7241e6-b2c6-42be-bdf8-2b9c17be4b0f" alt="File sharing settings"><figcaption></figcaption></figure></div>

{% endtab %}
{% endtabs %}

## Access shared folders

Once the network shares have been configured, they can be accessed by your Meshnet peers. Below, you can find instructions on accessing a shared folder from macOS.

1. Copy the device's Nord name directly from the NordVPN application by clicking it and choosing **Copy device’s Nord name**.<br>

   <div align="left"><figure><img src="https://3559400189-files.gitbook.io/~/files/v0/b/gitbook-x-prod.appspot.com/o/spaces%2F0cTezbT2vN0lurEio8Z5%2Fuploads%2FxKk9mtO2yQQZOdENgBLP%2Fnord_name_2.gif?alt=media&#x26;token=3878166a-52ba-47c7-aafb-333ea8243548" alt="Nord name copied from NordVPN application"><figcaption></figcaption></figure></div>

2. Control-click Finder![](https://3559400189-files.gitbook.io/~/files/v0/b/gitbook-x-prod.appspot.com/o/spaces%2F0cTezbT2vN0lurEio8Z5%2Fuploads%2FzliXwqqNaTS1rMMHONSJ%2Fmac-finder.svg?alt=media\&token=0c2f76d2-bdd5-4321-b458-b4f777d05622) and choose **Connect to server**.<br>

   ![Connect to server option](https://3559400189-files.gitbook.io/~/files/v0/b/gitbook-x-prod.appspot.com/o/spaces%2F0cTezbT2vN0lurEio8Z5%2Fuploads%2F5ImsTEYTiEgn14XcRwQ3%2Fmac_server_finder.png?alt=media\&token=ebf5fe72-a212-4570-baad-981cfab19390)

   &#x20;

3. In the new window, enter `smb://`, paste the Nord name followed by a slash (/) and the name of the network share, and then click **Connect**. \
   \
   **Example**

   `smb://secret.meerkat-andes.nord/MeshnetFolder`

   \
   ![Connect to server window filled in](https://3559400189-files.gitbook.io/~/files/v0/b/gitbook-x-prod.appspot.com/o/spaces%2F0cTezbT2vN0lurEio8Z5%2Fuploads%2FmK1T508Rs1two2TwURA7%2Fgo_to_server.png?alt=media\&token=89cd3cb0-8b8c-475f-9d6c-eeeeeb9bf4b4)

   &#x20;

4. Click **Connect** once more to confirm the connection.<br>

   ![Connection confirmation message](https://3559400189-files.gitbook.io/~/files/v0/b/gitbook-x-prod.appspot.com/o/spaces%2F0cTezbT2vN0lurEio8Z5%2Fuploads%2FlCWtNWTohyf7wt9K8KUG%2Fgo_to_server2.png?alt=media\&token=4d22b547-cb16-4075-94b2-e9a0e9a3e052)

   &#x20;

5. Select **Guest** or **Registered user**, depending on the folder’s configuration, and click **Connect**.

   \
   ![User selection](https://3559400189-files.gitbook.io/~/files/v0/b/gitbook-x-prod.appspot.com/o/spaces%2F0cTezbT2vN0lurEio8Z5%2Fuploads%2FaAqJRqgRKMzMe4bd06Xb%2Fgo_to_server3.png?alt=media\&token=da39c9e4-19ee-4491-99a7-5692db1e22f7)

## See also

* [Configure and access shared folders on Windows](https://meshnet.nordvpn.com/~/changes/1En9yEoSh1cmyjIBsnEk/how-to/remote-files-media-access/set-up-folder-sharing/configure-and-access-shared-folders-on-windows)
* [Configure and access shared folders on Linux](https://meshnet.nordvpn.com/~/changes/1En9yEoSh1cmyjIBsnEk/how-to/remote-files-media-access/set-up-folder-sharing/configure-and-access-shared-folders-on-linux)
* [Access shared folders on Android](https://meshnet.nordvpn.com/~/changes/1En9yEoSh1cmyjIBsnEk/how-to/remote-files-media-access/set-up-folder-sharing/access-shared-folders-on-android)
* [Access shared folders on iOS](https://meshnet.nordvpn.com/~/changes/1En9yEoSh1cmyjIBsnEk/how-to/remote-files-media-access/set-up-folder-sharing/access-shared-folders-on-android)
