# How to use Syncthing for remote continuous file synchronization
## Introduction
Backing up files is a crucial aspect of data management and should be considered a top priority for individuals and organizations alike. Accidental deletion, hardware failure, [malware attacks](https://nordvpn.com/cybersecurity/what-is-malware/), and natural disasters are just a few examples of potential threats that can lead to data loss. By synchronizing files between different devices and using backup folders, you can easily recover lost data and avoid potential disruptions.
[Syncthing](https://syncthing.net/) is a free and open-source continuous file synchronization program. The app allows you to link various devices and exchange data between them in real time. In addition, Syncthing allows you to select a network interface on each device that is used for file synchronization.
Once you enable [Meshnet ](https://nordvpn.com/meshnet/)on your device, it creates a new network interface using the [NordLynx technology](https://nordvpn.com/blog/nordlynx-protocol-wireguard/). This interface can then be used to increase the security of Syncthing file transfers even further with encrypted network tunnels. Moreover, you do not need to worry about allowing remote connections between your devices because Meshnet connects them to a single virtual network without poking additional holes in your firewall.
This article showcases how you can set up Syncthing on Windows, macOS, Linux, and Android devices and synchronize your files over Meshnet.
## Installing Syncthing
To start the configuration, you need to install Syncthing on your system.
{% tabs %}
{% tab title="Windows" %}
For convenience, the Syncthing Tray application will be used for Windows. Unlike the standard version, which requires an active terminal window during operation, Syncthing Tray can run in the background and be minimized to the system tray. If needed, alternative versions are available for download on Syncthing’s [Community contributions](https://docs.syncthing.net/users/contrib.html) page.
To install the app:
1. Visit the [Releases page](https://github.com/Martchus/syncthingtray/releases) of the Syncthing Tray GitHub repository.
2. Download the latest `syncthingtray` installer archive for the 64-bit version of Windows.\
\

3. Extract the downloaded archive.
4. Open the executable file to launch Syncthing Tray.
Syncthing is now active and ready for use on your system. Additionally, the app will launch automatically each time you reboot your device. You can see the Syncthing Tray icon in your system tray.

{% hint style="info" %}
**Note**
If the Windows Defender SmartScreen warning appears when attempting to launch the app, select **More info** and click **Run anyway**.
{% endhint %}
{% endtab %}
{% tab title="macOS" %}
To install the Syncthing macOS application bundle:
1. Visit the [Releases page](https://github.com/syncthing/syncthing-macos/releases) of the syncthing-macos GitHub repository.
2. Download the latest Syncthing .dmg file.\
\

3. Open the downloaded file.
4. In the new window, drag and drop **Syncthing** to the **Applications** folder.
5. Launch **Syncthing**.
Syncthing is now installed on your device and ready for use.
### Launch Syncthing automatically
To ensure the highest up-time and continuous file synchronization, it is best to launch Syncthing every time your system is started. However, launching the app manually may get tedious. To auto-launch Syncthing upon each reboot:
1. In the menu bar, click the Syncthing icon and select **Preferences**.\
\

2. Select the **Start at login** checkbox.\
\

Syncthing will now automatically start each time you log in to your computer.
{% endtab %}
{% tab title="Linux" %}
{% hint style="info" %}
**Note**
In this section, Ubuntu 22.04.1 LTS distribution is used as an example.
{% endhint %}
To install Syncthing on Linux:
1. Open **Terminal**.
2. Download and import Syncthing’s [PGP key](https://help.gnome.org/users/seahorse/stable/about-pgp.html.en) to your device by running this command:
3. Add the Syncthing repository to your repository list with this command:
echo "deb [signed-by=/usr/share/keyrings/syncthing-archive-keyring.gpg] https://apt.syncthing.net/ syncthing stable" | sudo tee /etc/apt/sources.list.d/syncthing.list
4. Fetch all available repository updates and install Syncthing by executing the following command:
sudo apt update && sudo apt install syncthing -y
### Launch Syncthing automatically
To ensure the highest up-time and continuous file synchronization, it is best to launch Syncthing every time your system is started. On many Linux distributions, you can utilize SystemD to start the Syncthing process each time your device is started by taking these steps:
1. Open **Terminal**.
2. Run the following command to initiate the Syncthing service upon each reboot:
```bash
sudo systemctl enable syncthing@$USER.service
```
3. Execute this command to start Syncthing right now:
```bash
sudo systemctl start syncthing@$USER.service
```
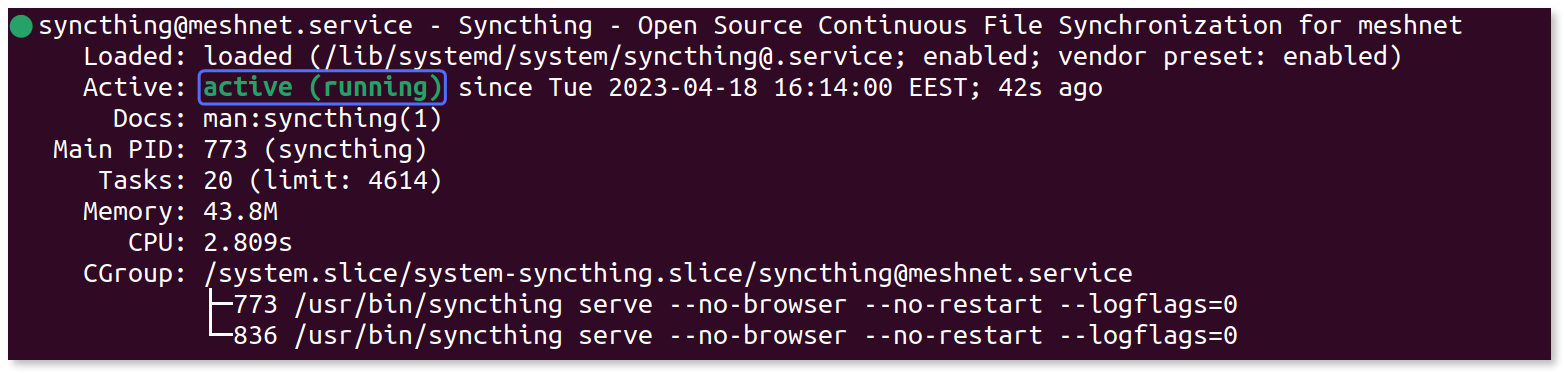
Syncthing is now active and ready for use on your system. You can check the status of the service with this command:
```bash
sudo systemctl status syncthing@$USER.service
```
The output should tell you that the service is active.
{% endtab %}
{% tab title="Android" %}
You can download and install the Syncthing app for Android from the following sources:
* [Releases page](https://github.com/syncthing/syncthing-android/releases) of the syncthing-android GitHub repository
* [Google Play Store](https://play.google.com/store/apps/details?id=com.nutomic.syncthingandroid)
* [F-Droid](https://f-droid.org/packages/com.nutomic.syncthingandroid/) Android app repository
{% endtab %}
{% endtabs %}
## Configuring Syncthing for remote file synchronization
Once you install Syncthing, its web interface is created. You can use the web interface to control all aspects of Syncthing, including managing your synchronization folders and devices.
### Set up web interface authentication
{% hint style="info" %}
**Note**
On Android devices, you do not need to carry out this procedure because Syncthing settings can only be accessed from the installed app.
To open the web interface on Android, launch **Syncthing**, tap the menu icon in the upper-left corner, and select **Web GUI**.
{% endhint %}
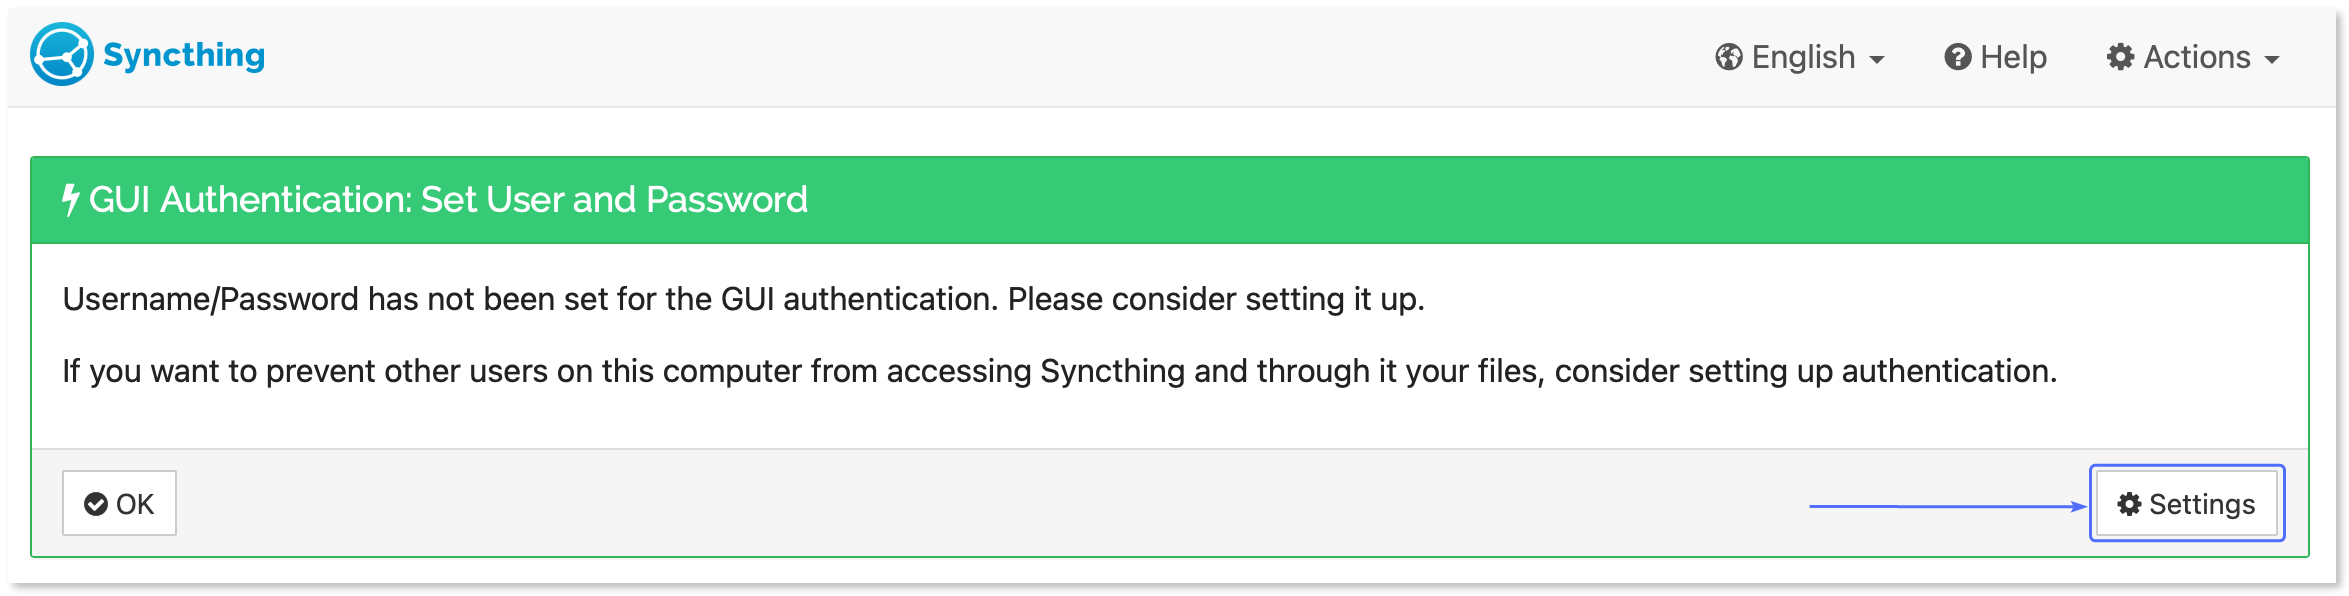
Even though, currently, the web interface can only be accessed from the host device, it is highly recommended to use username and password authentication. This is especially important to minimize the risk of [unauthorized access](https://nordvpn.com/blog/unauthorized-access/) if you plan to allow connecting to the web interface from other devices. To enable authentication:
1. Open your internet browser and visit the following URL:\
`127.0.0.1:8384/`
2. Under **GUI authentication: set user and password**, click the **Settings** button.
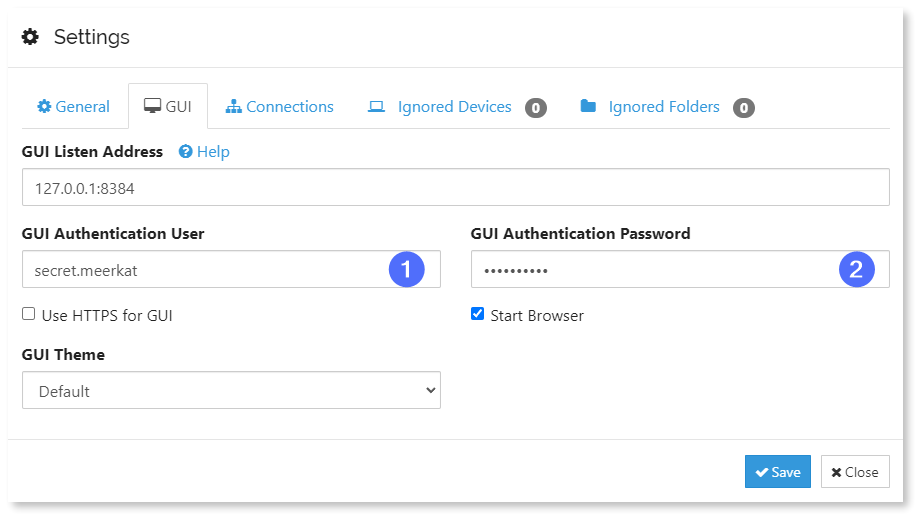
3. Switch to the **GUI** tab.
4. Type in your authentication details.
* In the **GUI authentication user** field, enter your desired username.
* In the **GUI authentication password** field, enter a secure password.\
\
**Example**
5. Click **Save**.
6. In the pop-up window, enter your newly created username and password and click **Sign in**.\
\

### Connect remote devices
With authentication in place, you can start linking other devices for data synchronization. You must have control of both devices to complete the connection procedure.
#### Connect the host device
1. In your Syncthing web interface, under **Remote devices**, click **Add remote device**.
2. On the **General** tab specify the following information:
* In the **Device ID** field, enter the Device ID of the remote device that you want to synchronize your files with.
* In the **Device name** field, type in a custom name for the specific device.
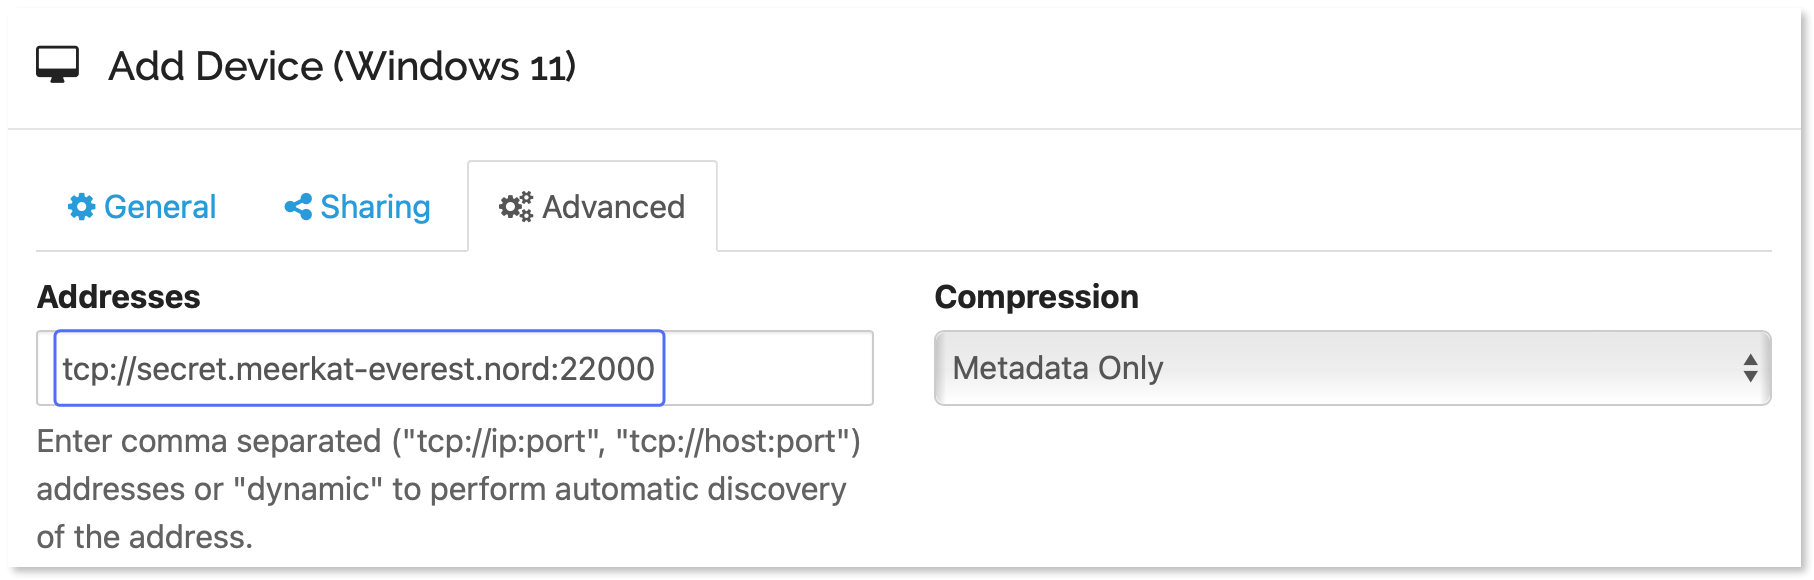
3. Select the **Advanced** tab.
4. In the **Addresses** field, enter `tcp://:22000`, replacing `` with the other device’s Nord name or Meshnet IP address.\
\
**Example**
5. Click **Save**.
#### Connect the client device
On the other device, you will receive a message asking if you want to connect with the new device. To finish linking the devices, you must accept the connection on the client device as well.
1. Open the Syncthing web interface.
2. Under **New device**, click **Add device**.
3. In the **Device name** field, enter a custom name for the device. Alternatively, you can leave the default name that was selected by the other device.
4. Switch to the **Advanced** tab.
5. In the **Addresses** field, enter `tcp://:22000`, replacing `` with the host device’s Nord name or Meshnet IP address.\
\
**Example**
6. Click **Save**.
After a few seconds, the device status will change to **Connected (unused)**.

### Add synchronization folders
Syncthing automatically creates a default synchronization folder called `Sync` in the user’s home directory. Nevertheless, you can create and share multiple new folders with selected devices.
#### Share a folder from the host device
1. In the Syncthing web interface, under **Folders**, select **Add folder**.
2. In the **Folder label** field, type in a custom label to easily differentiate the folder.
3. In the **Folder path** field, enter the path to the folder you want to synchronize. If the folder does not exist, it will be created automatically.
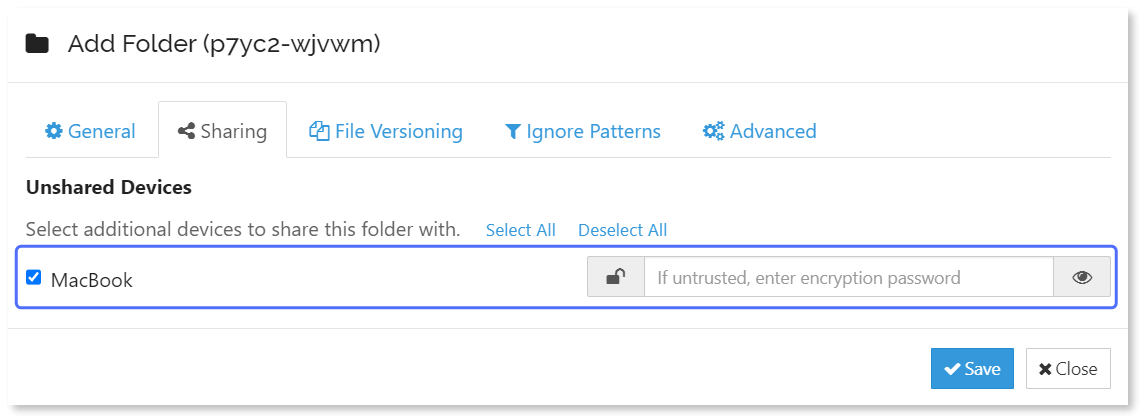
4. Switch to the **Sharing** tab.
5. Under **Unshared devices**, select the devices that you want to synchronize the folder with.\
6. Click **Save**.
The new folder is now visible under **Folders** on your Syncthing web interface.

#### Share a folder from the client device
On the client device, you will receive a message asking if you wish to add the shared folder to your system. To finish linking the folders:
1. Open the Syncthing web interface.
2. Under **New folder**, click **Add**.
3. In the **Folder label** field, type in a custom label to easily differentiate the folder.
4. In the **Folder path** field, enter the path where you want the synchronized folder to be located on your system.
5. Click **Save**.
The new folder should be visible under **Folders** on your device.
Your folders are now synchronized between your remote devices over Meshnet, and you can securely make backups of your storage hassle-free.
### Allow access to the web interface from other devices (optional)
While having access to the web interface only from the host device is more secure, you may want to have access to it over the network. To change the address of the web interface:
1. In your Syncthing web interface, in the upper-right corner, select **Actions** > **Settings**.
2. Switch to the **GUI** tab.
3. Change the **GUI listen address** to `0.0.0.0:8384`.
4. Click **Save**.
Your Syncthing web interface can now be accessed from the device’s local network or over Meshnet using the Nord name or the Meshnet IP address with the port number `8384`.