# How to set up an Android phone as a security camera with remote access
## Introduction
Home security cameras are becoming a popular purchase in many households. You feel a sense of security when you have constant surveillance over your property. Given the high cost of purchasing a full security camera system and the uncertainty around the need for one, many people are turning to more affordable alternatives.
One such option is repurposing an older Android phone as a security camera, which is both cost-effective and simple to set up. However, if you want to access the camera remotely, you need to configure [port forwarding](https://nordvpn.com/blog/port-forwarding/) on your router.
Fortunately, you can completely bypass port forwarding by using [Meshnet](https://nordvpn.com/meshnet/). With Meshnet, you can connect remote devices to virtual networks, allowing each device to communicate with one another as if they were on the same [local area network](https://nordvpn.com/blog/what-is-lan/) (LAN).
This guide contains instructions on how you can create a remotely accessible security camera using an older Android phone and Meshnet.
## Before you begin
Make sure that:
* Your phone is running Android 7.0 or later.
* Your phone has a stable internet connection.
* Your phone has a constant power source.
* You have [installed NordVPN on Android](https://support.nordvpn.com/1047409182).
* You have [enabled Meshnet on Android](https://meshnet.nordvpn.com/~/changes/5hiVtBuK6qwLGxb0SjCm/getting-started/how-to-start-using-meshnet/using-meshnet-on-android#enable-meshnet-on-android).
{% hint style="info" %}
**Note**
The article demonstrates the setup procedure using Android 13 as an example.
{% endhint %}
## Install IP Webcam software
With all of the prerequisites taken care of, you can install IP Webcam — the application that will turn your phone into a security camera. You can download IP Webcam for free from the [Google Play Store](https://play.google.com/store/apps/details?id=com.pas.webcam\&hl=en\&gl=US).

## Set up login credentials
By default, the IP Webcam interface does not require any authentication. To minimize the [risk of unauthorized access](https://nordvpn.com/blog/unauthorized-access/), it is best to secure your camera with strong login credentials. To enable login authentication:
1. Open **IP Webcam**.
2. Under **Connection settings**, tap the **Local broadcasting** option.\
\

3. Select **Login/password**.
4. Enter your desired username and password combination and click **OK**.\
\

## Select a recording location
It is recommended to select a specific directory for your recordings. This way, all of the footage is organized and easily accessible. To choose a folder:
1. Open **IP Webcam**.
2. Under **IP Webcam settings**, select **Video preferences**.
3. Tap **Video recording** > **Save videos to**.
4. Select your preferred folder or create a new one and tap **Use this folder**.
## Start your security camera
Your phone is now fully prepared to function as a security camera. To start the IP Webcam server:
1. Open **IP Webcam**.
2. Tap the three-dot menu in the upper-right corner and select **Start server**.\
\

3. If requested, grant IP Webcam the required permissions.
After a few seconds, the camera output will be visible on-screen.
## Access your security camera over Meshnet
Your security camera is now active, and you can access it either from your local network or remotely, using Meshnet.
1. Copy the Nord name of your new security camera from the NordVPN application.
2. Open your internet browser.
3. In the URL field, paste the copied Nord name, add `:8080`, and press **Enter**.\
\
**Example**\
`secret.meerkat-sierranevada.nord:8080`
4. Type in your login username and password and click **Sign in**.
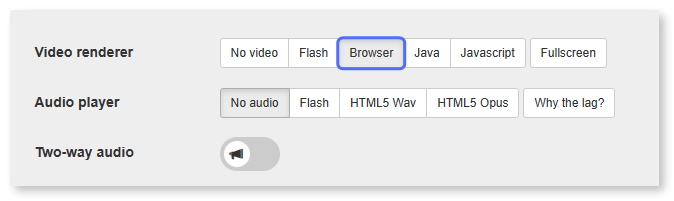
5. Next to **Video renderer**, select **Browser** to monitor your camera in real-time.
### Start recording
To start recording the footage of your security camera, click the Record manual button under **Recorder control** in the IP Webcam web interface.
After you have started the recording, you will see the name of the file in which the footage is being saved.

If you wish to stop the recording, click the **Stop** button.
### View recorded footage
You can check all of the recorded footage from your security camera in the **Video archive** tab of the IP Webcam web interface.