# Connect to a Windows device
To log in to your Windows PC remotely over Meshnet, you need to set up remote access on your Windows PC and use a remote desktop client on the device from which you are connecting.
## Before you begin
Make sure that:
* Your remote PC and the device you want to use to access it are [linked over Meshnet](https://meshnet.nordvpn.com/~/changes/5hiVtBuK6qwLGxb0SjCm/getting-started/how-to-start-using-meshnet).
* Your remote PC runs a Pro edition of Windows 10 or 11. To check this:
1. Select **Start** and open **Settings**.
2. Go to **System** > **About** and look for **Edition**.
* Your remote PC is turned on.
Also, it's a good idea to look up the Nord name or Meshnet IP address of the computer you're connecting to in your NordVPN app. You can copy this information by going to Meshnet and clicking the device’s Nord name or IP address, as shown:
## Enable remote access on your PC
{% hint style="info" %}
**Note**
For this scenario, Windows 11 Pro will be used as an example, but the instructions should also apply to Windows 10 Pro.
{% endhint %}
Set up your PC to accept remote connections:
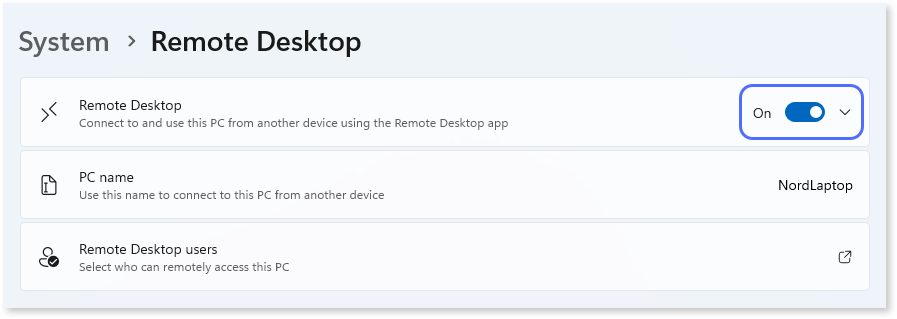
1. Select **Start** and open **Settings**.
2. Go to **System** > **Remote Desktop**.
3. Turn on the **Remote Desktop** toggle.
4. Select **Confirm**.
Have ready the name for the account you're using on your PC.
{% hint style="success" %}
**Tip**
To check if your account has permission to access this PC remotely, select **Remote Desktop users** under **Remote Desktop**, and then find your user account name in the dialog that appears.
{% endhint %}
## Connect to your remote PC
You can use different remote desktop clients depending on the platform you are connecting from. Below are the steps to connect to a remote Windows computer using the following apps:
* Microsoft Remote Desktop, available on Windows, macOS, iOS, and Android
* NoMachine, available on all major platforms and known for its fast performance
* Remmina, available on Linux
### Using Microsoft Remote Desktop for remote connections
To establish a remote connection using Microsoft Remote Desktop, follow the steps below.
{% tabs %}
{% tab title="From Windows" %}
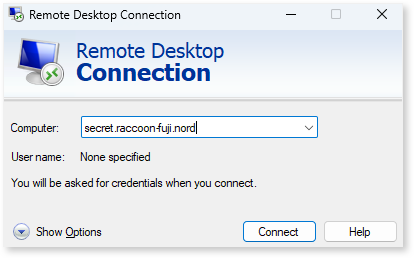
1. In the search box on the taskbar, type `Remote Desktop Connection` and then click **Remote Desktop Connection**.
2. In the dialog that opens, enter either the Nord name or Meshnet IP of the PC you want to access.\
3. Click **Connect**.
4. Enter the following information, and then click **OK**:
* Your remote PC account name
* The password you use to log in to your remote PC

5. You may receive a warning indicating that the identity of the remote computer cannot be verified. When connecting to a trusted computer, such as one on your Meshnet, click **Yes** to continue.
{% hint style="success" %}
**Tip**
If you don't want to see this dialog in the future, select the **Don't ask me again for connections to this computer** checkbox.
{% endhint %}
{% endtab %}
{% tab title="From macOS" %}
Start by downloading and installing the [Microsoft Remote Desktop](https://apps.apple.com/app/microsoft-remote-desktop/id1295203466?mt=12) app, available for free from the Mac App Store.
#### Set up a remote connection
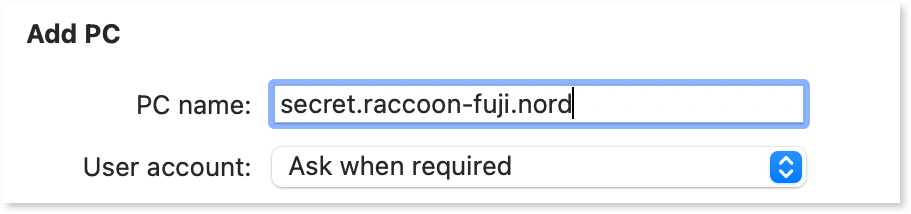
1. Open **Microsoft Remote Desktop**, click the plus (+) button, and select **Add PC**.
2. In the **PC name** box, enter either the Nord name or Meshnet IP of the PC you want to access.
3. Select **Add user account** from the **User account** dropdown list.
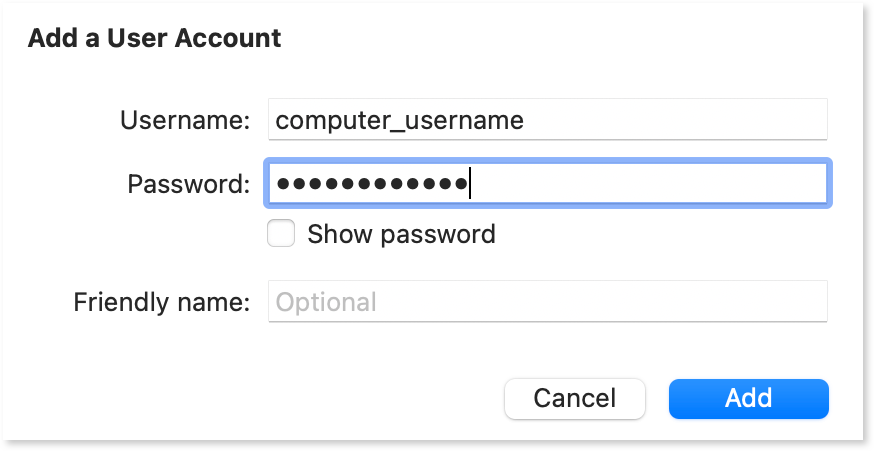
4. Enter your remote desktop credentials to save for use with this connection.
* **Username:** your remote PC account name
* **Password:** the password you use to log in to your remote PC
5. Optionally, you can give a nickname to your connection in the **Friendly name** field. It is a way to easily identify your Remote Desktop connections.
6. Click **Add** to save changes and then click **Add** again.
#### Access your remote PC
1. Double-click the saved connection that you added.
2. You may receive a warning indicating that the digital certificate of the computer you're trying to access cannot be verified. When connecting to a trusted computer, such as one on your Meshnet, click **Continue**.
3. If you don't want to see this dialog in the future, click **Show certificate** and then select the **Always trust** checkbox.
{% hint style="info" %}
**Note**
An error may sometimes occur when you try to connect to a Windows computer from a Mac. If this is the case, ensure your firewall or antivirus software on the Windows computer isn't blocking the connection. Your specific network settings can also affect the connection.
{% endhint %}
{% endtab %}
{% tab title="From iOS" %}
Start by downloading and installing the [Microsoft Remote Desktop](https://apps.apple.com/app/microsoft-remote-desktop/id714464092) client from the iOS App Store.
#### Set up a remote connection
1. Open **RD Client**.
2. On the **PCs** tab, tap the plus (+) button, and then select **Add PC**.
3. Tap **PC name** and enter either the Nord name or Meshnet IP of the PC you want to access.\
\

4. Return to the previous menu and tap **User account** > **Add user** **account**.
5. Enter the following information to save for use with this connection:
* Your remote PC account name
* The password you use to log in to your remote PC
6. Optionally, tap **Friendly name** to give a nickname to your connection. This way, you can easily identify your Remote Desktop connections.
7. Tap **Save**, select the account you've just created, and tap **Save** again.
The new connection will appear under **PCs**. Tap it whenever you want to initiate a remote desktop session.
{% endtab %}
{% tab title="From Android" %}
Start by downloading and installing the [Microsoft Remote Desktop](https://play.google.com/store/apps/details?id=com.microsoft.rdc.androidx) app from Google Play.
#### Set up a remote connection
1. Open **RD Client**.
2. On the **PCs** tab, tap the plus (+) button, and then select **Add PC**.
3. Select **Add manually**.
4. Under **PC name**, enter either the Nord name or Meshnet IP of the PC you want to access. \
\

5. Under **User account**, select the **Add user account** option.
6. Enter the following information to save for use with this connection and tap **Save**:
* Your remote PC account name
* The password you use to log in to your remote PC\
\

7. Tap **Save** again.
#### Access your remote PC
1. From the main screen, select the saved connection that you added.
2. You may receive a warning indicating that the digital certificate of the computer you're trying to access cannot be verified. When connecting to a trusted computer, such as one on your Meshnet, tap **Connect**.
3. If you don't want to see this dialog in the future, select the **Never ask again for connections to this PC** checkbox.
{% endtab %}
{% endtabs %}
Having followed these steps, you should now be able to access and control your PC remotely using Microsoft Remote Desktop.
### Using NoMachine for remote connections
To establish a remote connection using NoMachine, proceed with the guidelines below.
{% tabs %}
{% tab title="From Windows, macOS, and Linux" %}
Start by downloading the [NoMachine](https://www.nomachine.com/) app and installing it on both your remote and local computers.
#### Set up a remote connection
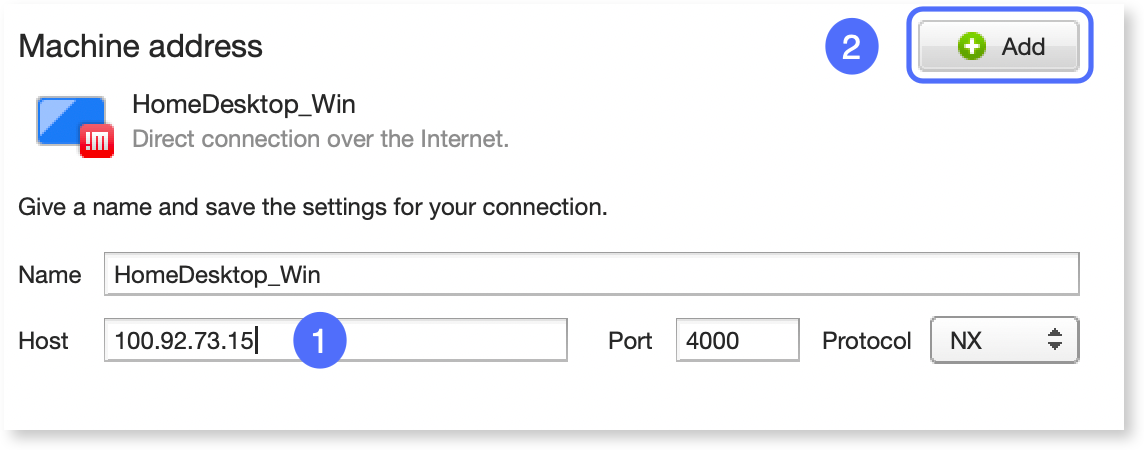
1. Launch **NoMachine** on your local device and select the **Add** button to create a new connection.
2. Optionally, in the **Name** field, provide a custom name for the connection.
3. In the **Host** field, enter either the Nord name or Meshnet IP of the computer you want to access, and then select **Add**.
4. On the NoMachine main screen, double-click the newly created connection to initiate the remote connection.
5. If a warning appears indicating that the host's authenticity cannot be confirmed, select **OK** to proceed.
6. Enter your remote desktop credentials and select **OK**.
* **Username:** your remote Mac account name
* **Password:** the password you use to log in to your Mac
{% endtab %}
{% tab title="From iOS and Android" %}
Start by downloading the [NoMachine](https://www.nomachine.com/) app and installing it on both your remote and local devices.
#### Set up a remote connection
1. Launch **NoMachine** on your local device and select the Add button in the upper-left corner to create a new connection.\
\

2. Ensure that **NX** is selected as the protocol and tap **Continue**.
3. In the **Host** field, enter either the Nord name or Meshnet IP of the computer you want to access, and then select **Continue**.\
\

4. Keep the default options for **Authentication** and **Proxy**.
5. Optionally, in the **Name** field, provide a custom name for the connection and tap **Done**.
6. On the NoMachine main screen, double-tap the newly created connection to initiate the remote connection.
7. Enter your remote desktop credentials and select **OK**.
* **Username:** your remote Mac account name
* **Password:** the password you use to log in to your Mac
{% endtab %}
{% endtabs %}
With these steps completed, you should now be able to access and control your PC remotely using NoMachine.
### Using Remmina for remote connections from Linux
{% hint style="info" %}
**Note**
The instructions below apply primarily to Ubuntu 16.04 LTS or above, but if you use a different distribution of Linux, the procedure should remain similar.
{% endhint %}
#### Install the Remmina Remote Desktop Client
If you don't have Remmina installed on your system, install it using one of the methods described below.
{% tabs %}
{% tab title="From the terminal" %}
1. Open the terminal.
2. Update the package manager list of available packages by running the following command:
```bash
sudo apt update
```
3. Install Remmina by entering this command:
```bash
sudo apt install remmina remmina-plugin-vnc
```
{% endtab %}
{% tab title="From Ubuntu Software" %}
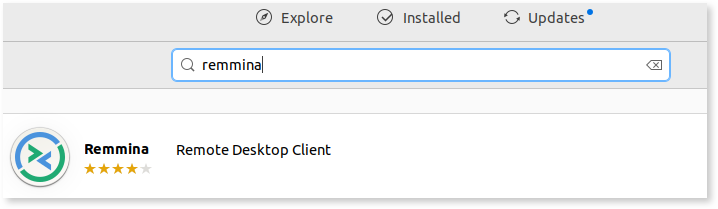
1. Open the Ubuntu Software application.
2. In the search bar, enter `remmina` and select the matching result.
3. Click the **Install** button.
{% endtab %}
{% endtabs %}
#### Set up a remote connection
1. Open the Remmina app by going to **Show applications** and searching for *remmina*.
2. Click the New connection profile button in the upper-left corner of the application window.
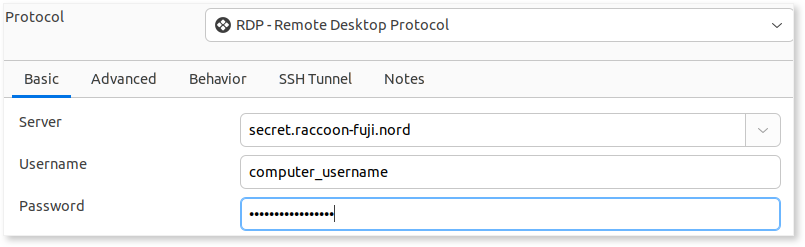
3. Make sure **RDP** — **Remote Desktop Protocol** is selected in the **Protocol** box.
4. Under **Basic**, enter the information to create a reusable connection.
* **Server:** the Nord name or the Meshnet IP of the PC you want to access
* **Username:** your remote PC account name
* **Password:** the password you use to log in to your remote PC
5. Click **Save**.
6. Accept the certificate presented by the server to verify that you trust the computer you are trying to access.
The new connection will appear in the Remmina window. You can double-click it whenever you want to initiate a remote desktop session.
## See also
* [Connect to a macOS device](https://meshnet.nordvpn.com/~/changes/5hiVtBuK6qwLGxb0SjCm/how-to/remote-access/log-in-to-pc-remotely/connect-to-macos)
* [Connect to a Linux device](https://meshnet.nordvpn.com/~/changes/5hiVtBuK6qwLGxb0SjCm/how-to/remote-access/log-in-to-pc-remotely/connect-to-linux)
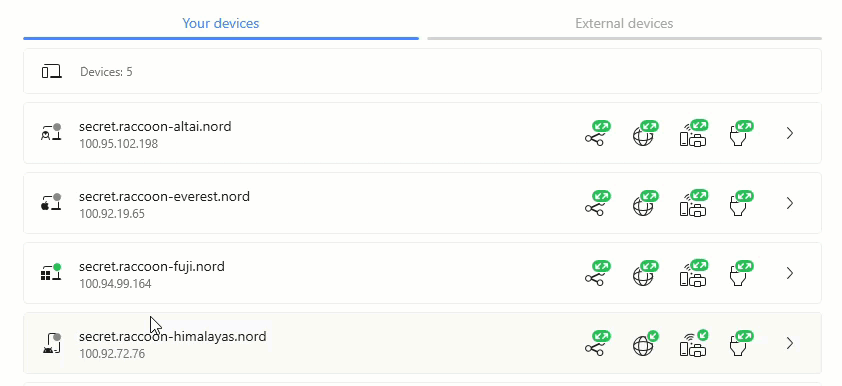
 and clicking the device’s Nord name or IP address, as shown:
 button in the upper-left corner of the application window.
3. Make sure **RDP** — **Remote Desktop Protocol** is selected in the **Protocol** box.
4. Under **Basic**, enter the information to create a reusable connection.
* **Server:** the Nord name or the Meshnet IP of the PC you want to access
* **Username:** your remote PC account name
* **Password:** the password you use to log in to your remote PC
button in the upper-left corner of the application window.
3. Make sure **RDP** — **Remote Desktop Protocol** is selected in the **Protocol** box.
4. Under **Basic**, enter the information to create a reusable connection.
* **Server:** the Nord name or the Meshnet IP of the PC you want to access
* **Username:** your remote PC account name
* **Password:** the password you use to log in to your remote PC